 ultimate-guide
How to Choose Promotional Apparel: 7-Step Guide
Table of Contents
- Step 1: Define the Purpose and Audience for Your Promotional Apparel
- Step 2: Set Your Promotional Apparel Budget Planning Goals
- Step 3: Choose the Best Promotional Apparel for Employees by Fabric
- Step 4: Compare Embroidery vs Screen Printing for Your Design
- Step 5: Apply Custom Apparel Design Best Practices for Logo Placement
- Step 6: Order the Right Sizes and Plan for Team Inventory
- Step 7: Vet Your Supplier and Test for Post-Wash Durability
- Make Your Merchandise Strategy Work for Years
- Frequently Asked Questions
Last Updated: September 4, 2026
Choosing the right branded gear can feel like a gamble, especially if a previous batch faded or peeled after a few washes. Knowing how to choose promotional apparel that survives real-world use comes down to a practical seven-step process, not guesswork. At Logo Concepts & Printing, we have spent over 25 years guiding businesses through this process.
The most common mistake we see is starting with the design instead of the strategy. Promotional apparel is any branded garment used to promote a business, from company uniforms to event giveaways. Before you pick a color or logo placement, define who the shirt is for and what job it has to do.
Step 1: Define the Purpose and Audience for Your Promotional Apparel
Start by asking: What must this garment accomplish? A trade show giveaway shirt has a different job than a uniform for an automotive shop. Defining the primary use case determines every later choice, from fabric weight to decoration method.
Consider who will wear the item. Are you outfitting employees who need durable workwear, or creating a gift for customers and prospects? For internal teams, prioritize comfort and durability since they wear the item repeatedly. For external giveaways, focus on broad appeal and a fit that flatters most body types.
Your target demographic influences sizing, style, and color palette. A younger audience often prefers modern, athletic cuts, while a corporate client base might respond better to classic polo shirts. Document your answers before moving forward, because they directly shape the budget and material decisions that follow.
Step 2: Set Your Promotional Apparel Budget Planning Goals
Your budget should be tied to the garment's purpose, not just a raw number. Promotional apparel budget planning requires calculating the cost-per-impression, which is the ad spend divided by how many times people will see the logo. A high-quality shirt worn weekly for two years is far more valuable than a cheap one worn twice.
A common approach is to allocate more per unit for a smaller, internal team and less per unit for large event giveaways. For employee uniforms, durability justifies a higher spend because the shirt represents your brand daily. For event swag, prioritize a lower cost per unit to maximize quantity within your total budget.
Pricing depends on quantity, decoration method, and delivery timelines. Most suppliers, including Logo Concepts & Printing, offer volume discounts, so the per-unit price drops as your order grows. Review your budget against the actual quote, not a generic estimate, before committing.
Step 3: Choose the Best Promotional Apparel for Employees by Fabric
Fabric quality is the difference between a shirt that becomes a favorite and one that sits in a drawer. The best promotional apparel for employees starts with understanding fabric weight, usually measured in GSM (grams per square meter). A higher GSM means a thicker, more durable fabric, while a lower GSM is lighter and cooler.
For workwear and uniforms, look for heavier fabrics that withstand frequent washing. For event shirts, a mid-weight cotton or cotton-blend balances comfort and cost. Pay attention to fabric composition: 100% cotton feels soft but may shrink, while polyester blends resist wrinkles and hold their shape.
Consider the climate and the job. An outdoor construction crew needs breathable, moisture-wicking materials, while an office team may prefer a crisp cotton-poly blend for a professional look. Textile quality also affects how well the decoration adheres, so a smoother, tightly woven fabric is generally better for detailed prints.
A Practical Fabric Reference for Common Promotional Styles
Most suppliers stock a limited set of fabric families. Knowing what each one does, and does not, do helps you match the garment to the job without guessing.
- 100% Cotton (Ring-Spun or Combed): The standard for event t-shirts and giveaways. Ring-spun cotton is softer and drapes better than open-end cotton, which feels stiffer and tends to pill. Combed cotton removes short fibers for a smoother surface, which helps screen printing hold detail. Expect 4.3 to 5.5 oz/yd² for a classic tee; 6 oz and above moves into heavyweight territory.
- Cotton-Polyester Blends (50/50 or 60/40): The workhorse for uniforms. Polyester adds wrinkle resistance and reduces shrinkage, while cotton keeps the hand-feel breathable. A 50/50 blend is the most common choice for team uniforms because it balances cost and durability. The trade-off: blends can pill faster than 100% cotton if the poly content is low-grade.
- Tri-Blend (Cotton/Polyester/Rayon): A modern, athletic-feeling fabric that drapes well and feels broken-in from the first wear. Tri-blends are popular for lifestyle-oriented giveaways and younger audiences. They are lighter (typically 3.8 to 4.2 oz/yd²) and less durable for heavy industrial use.
- Performance Fabrics (100% Polyester or Nylon Blends): Designed for moisture wicking and stretch. These are the right call for outdoor crews, fitness events, or any job where sweat is a factor. The catch: performance fabrics require low-heat washing and should never be ironed directly on the logo, or the decoration can delaminate.
- Fleece and Heavyweight Knits: For hoodies and jackets, look for 7.5 oz/yd² or higher. A brushed-back fleece interior traps warmth, while a French terry loop-back is lighter and more breathable. For work environments, a cotton-poly fleece with a reinforced collar holds up better than a thin, single-layer knit.
The Sustainability Angle Most Guides Ignore
Most promotional apparel guides stop at cotton vs. poly. But a growing share of buyers, especially those ordering for sustainability-focused brands, universities, or climate-conscious events, now ask a second question: where did this fabric come from, and what happens when the shirt wears out?
Here is what you can reasonably ask a supplier about without needing a third-party audit:
- Recycled Polyester (rPET): Made from post-consumer plastic bottles. It performs like virgin polyester for moisture wicking and durability. The main limitation is color consistency, recycled fibers can dye slightly unevenly, so if you need a precise brand color match, request a lab dip before production.
- Organic Cotton: Grown without synthetic pesticides or fertilizers. It does not inherently mean the fabric is softer or more durable, but it does signal a commitment to a cleaner supply chain. Expect a modest price premium over conventional cotton.
- Bluesign-Certified Mills: Bluesign certification covers the entire textile supply chain, from raw materials to finished fabric, for responsible chemical use and worker safety. If a supplier says a garment is made in a Bluesign-certified mill, that is a verifiable claim you can check.
- Low-Impact Dyes and Water-Based Inks: For decoration, water-based plastisol-free inks reduce the environmental load compared to traditional PVC-based inks. They also produce a softer hand-feel on the print area, which is a bonus for the wearer.
A practical approach: ask your supplier which catalog items are available in recycled or organic options. If they cannot answer, that tells you something about their sourcing depth. If they can, request a sample of the sustainable version alongside the standard one, the hand-feel difference is often noticeable, and you need to confirm your team will actually wear it.
Step 4: Compare Embroidery vs Screen Printing for Your Design
The decoration method determines your garment's look, feel, and longevity. When comparing embroidery vs screen printing, consider the logo's complexity and the fabric type. Embroidery stitches the design directly into the garment, offering a premium, textured finish that holds up well to washing. Screen printing applies ink through a mesh stencil, creating a smooth, vibrant print ideal for bold graphics and larger areas.
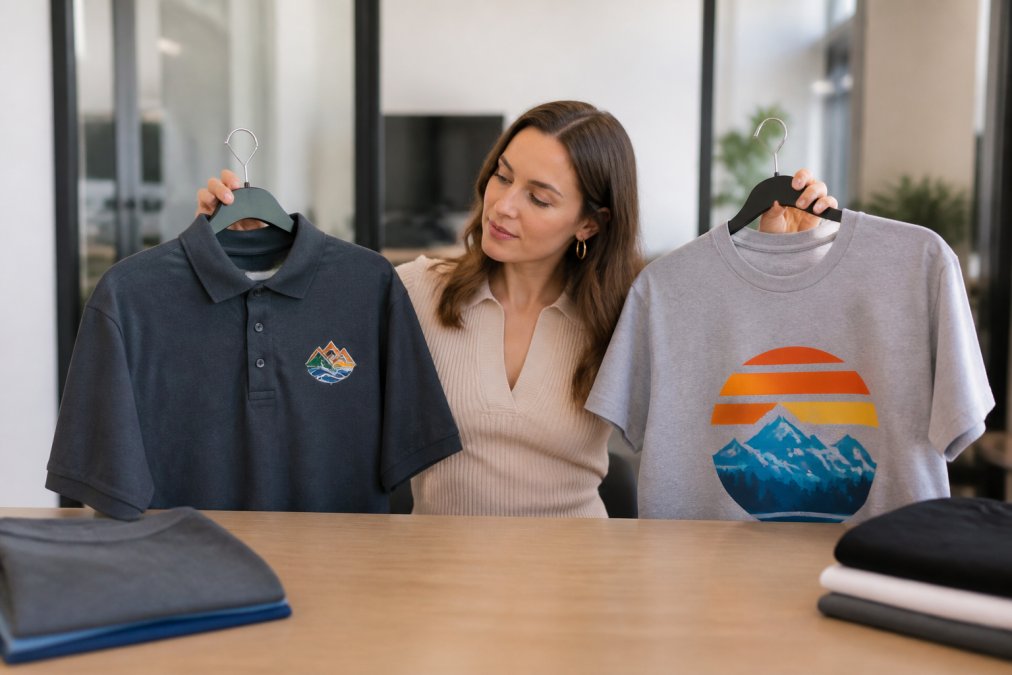
Embroidery is the best choice for polo shirts, jackets, and hats where a professional, long-lasting look matters. Screen printing excels on t-shirts and sweatshirts where you want a soft hand-feel and vivid colors. Heat transfer and direct-to-garment printing are other options for highly detailed, full-color artwork, but they may not offer the same durability as embroidery for frequently washed items.
| Decoration Method | Best For | Durability | Look |
|---|---|---|---|
| Embroidery | Polos, hats, jackets | High, resists fading | Premium, textured |
| Screen Printing | T-shirts, event wear | Good, may crack over time | Smooth, vibrant |
| Heat Transfer | Small runs, complex colors | Moderate, can peel | Smooth, detailed |
| Direct-to-Garment | Full-color photos, soft feel | Good | Soft, printed |
Step 5: Apply Custom Apparel Design Best Practices for Logo Placement
Placement matters more than most people expect. Custom apparel design best practices dictate that the logo should sit where it is most visible when the wearer stands naturally. The left chest is the standard for a subtle, professional look, while a large back print maximizes brand visibility for event staff.
Keep your design guidelines simple. A cluttered graphic loses impact, so limit the design to a clear logo and a short tagline if needed. Ensure your color palette contrasts with the garment color so the logo pops without clashing. Your supplier should provide a digital mockup for approval before production, which is your chance to catch placement errors.
For workwear, functional utility matters. A logo placed too low or across a pocket seam can distort during wear. Trust your supplier's expertise on sizing the logo relative to the garment, since a logo that looks perfect on a computer screen can appear too large or too small on an actual body.
Step 6: Order the Right Sizes and Plan for Team Inventory
Sizing is where many orders go wrong. A standard bulk order assumes a bell curve of sizes, but your team may not fit that curve. Ask for a size chart and order a range that matches your actual staff, not a generic distribution.
For teams, order a few extra sizes at the extremes, like XS and 3XL, to avoid an employee not fitting the provided shirt. For customer giveaways, unisex sizing is safer, but fit preferences vary. Offering a choice between a classic fit and a modern athletic fit can increase the likelihood the shirt gets worn.
Inventory management for teams requires tracking what you have in stock. If you are ordering uniforms, order extras to cover turnover and future hires. A small buffer of 10-15 percent prevents reorder delays that leave a new employee without a branded shirt for their first month.
Step 7: Vet Your Supplier and Test for Post-Wash Durability
A reliable supplier is your safeguard against wasted spend. Ask about their production timeline and whether they have an in-house design team that can handle rush jobs when your marketing campaign moves fast. A supplier that offers a mockup of every order in record time helps you approve details before anything goes to print.
Before committing to a large run, request a sample. Wash it several times to check for fading, peeling, or shrinkage. This post-wash durability test is the only reliable way to verify the print quality will not degrade after a few washes, a common fear if you have been burned by a previous vendor.
Vet their customer service by asking how they handle errors. A professional supplier will have a process to make sure you approve everything and will stand behind their work if a batch is flawed. Check if they have affiliations with industry groups, which often signals a commitment to quality standards and competitive pricing.
A Structured Supplier Evaluation Checklist
Most guides tell you to "find a good supplier" without telling you how. Here is a practical framework that separates a true production partner from a middleman who just forwards files to a print shop:
- Ask about their in-house production capacity. Do they own the embroidery machines or screen-printing presses, or do they outsource? In-house production means they control quality and turnaround. Outsourced production is not automatically bad, but it adds a layer of communication where errors can slip through.
- Request their standard production timeline in writing. A professional supplier can tell you exactly how many business days from mockup approval to shipment. Vague answers like "about two weeks" are a red flag.
- Ask about their reorder process. If you need 20 more shirts in six months, can they match the original fabric and decoration specs? A supplier that keeps digital records of your order can replicate it exactly. One that does not will force you to re-approve everything.
- Check their error resolution policy. Ask directly: "What happens if 10 of the 100 shirts arrive with a misaligned logo?" A confident supplier will have a clear reprint or refund process. A hesitant one will likely make you fight for a fix.
- Verify industry affiliations. Membership in the Promotional Products Association International (PPAI) or the Advertising Specialty Institute (ASI) indicates the supplier operates within an established industry framework with ethical guidelines and dispute resolution mechanisms.
The Post-Wash Durability Test Protocol
A single wash test is not enough. Here is the protocol that procurement managers at large organizations commonly use before approving a bulk order:
- Wash the sample five times in warm water (not hot) with standard detergent. Do not use fabric softener, which can coat the fibers and mask how the fabric actually behaves.
- Tumble dry on medium heat after each wash. This is the harshest condition most branded apparel will face in normal use.
- After each wash, check three things:
- Shrinkage: Measure the chest width and length before the first wash and after the fifth. A shrinkage rate above 5 percent means the garment will not fit properly after a few wears. Most quality blanks shrink 2-3 percent.
- Print cracking or peeling: Flex the printed area gently. If you see cracks forming after the third wash, the ink was not cured properly or the fabric was not pre-treated correctly.
- Embroidery thread integrity: Check for loose threads, puckering around the stitch area, or color bleeding from the thread into the fabric.
- Test the decoration on the actual fabric you plan to order. A print that looks great on a 100% cotton sample may behave differently on a tri-blend or performance fabric.
This five-wash test takes about a week of your time but costs almost nothing. It is the single most reliable way to avoid the disappointment of a batch that looks great on day one and falls apart by week three.
Make Your Merchandise Strategy Work for Years
Planning promotional apparel is not a one-time transaction; it is a long-term merchandise strategy. By following these seven steps, you shift from buying shirts to building a durable, visible extension of your brand identity. You avoid the common pitfalls of poor fabric, bad placement, and unreliable vendors that lead to wasted budgets and disappointed teams.
The process works best when you have a partner who understands both the marketing theory and the practical procurement details. At Logo Concepts & Printing, our in-house graphic design team and campaign development expertise help you navigate fabric selection, decoration methods, and inventory planning. We provide access to thousands of customizable items and can mock up your order quickly, so you know exactly what you are approving before production begins.
Your team deserves apparel that looks professional and lasts. Review the FTC guidelines on advertising and promotional products to ensure your branded merchandise complies with disclosure rules, and then explore the American Apparel & Footwear Association's resources on apparel quality standards for deeper technical guidance. Whether you need screen printing, embroidery, or a complete branded uniform program, our team is ready to help you plan a campaign that fits your timeline and budget. Get started with Logo Concepts & Printing and order apparel that works as hard as your team does. See how corporate branding impacts employee pride and customer perception
Frequently Asked Questions
What factors should you consider when choosing promotional apparel?
Start with the purpose, your target demographic, and the message you want to send. Then evaluate fabric quality (GSM weight), decoration method, and color options. Your budget and timeline also matter, as does the fit you want for your team. The best promotional apparel balances durability with everyday wearability so your logo gets seen repeatedly, not just once.
How do you balance budget and quality in promotional apparel?
Focus your spending on the items people will wear most often. Spend more on heavier fabric weights for hoodies or polos that will survive frequent washing. If your promotional apparel budget is tight, consider a simpler color palette or a single decoration location. Request samples before placing a bulk order so you can verify the material quality and print finish firsthand.
How does embroidery vs screen printing affect the final product?
Embroidery uses stitched thread, making it durable and professional for polos, jackets, and hats. Screen printing applies ink directly to the fabric, which is ideal for detailed graphics, large text, and soft-hand t-shirts. Choose embroidery for corporate gifting and uniforms, and screen printing for events or giveaways where you need vibrant colors at a lower cost per item.
What is the best way to choose apparel sizes for a large group?
Ask your supplier for a sizing chart and order a range that matches your team's demographics. A standard corporate or event order often skews toward medium and large, but include extra small and 2XL options to ensure a good fit. Consider offering unisex or gender-specific cuts. For teams, plan a small inventory of backup sizes to handle exchanges smoothly.
Choosing promotional apparel involves balancing budget, fabric, and fit while avoiding the common mistakes that lead to faded logos and unworn shirts. The most reliable path is to work with an experienced partner who can guide you from concept to delivery. Contact us today to start your next branded apparel project with confidence.